Showing posts with label diy project. Show all posts

Saturday, April 30, 2016

Industrial Floating Shelves

About a year ago, this is what our children's bedroom looked like.  Then Brent and I bought a California King bed (BTW it's AMAZING!) and it shook up the whole household.  Living with a queen size wasn't working for us anymore - snuggling with four people to watch a movie or read nighttime books was getting a little tight, which was the reason for the upgrade. We knew that with the purchase of that large bed meant Brent and I would need to relocate our master bedroom to the second floor to accommodate such a large bed.  After we moved upstairs, that left two bedrooms on the main floor, one for each kid.  
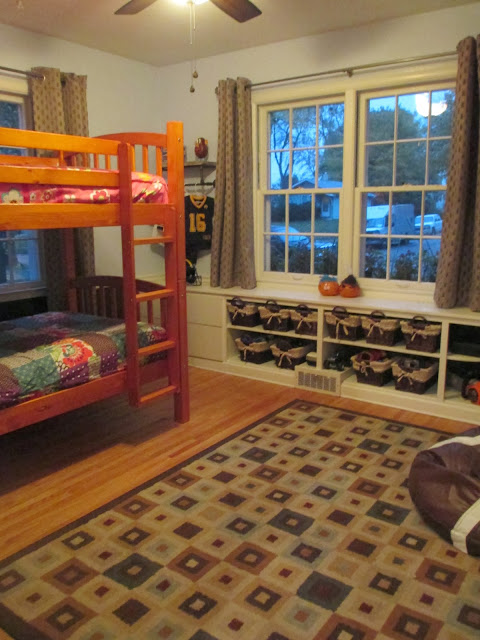
Problem is, they still prefer to sleep in the same room, so we moved both of them to the back bedroom and this front bedroom became their "playroom."  Which sounded great at first - WOW - a dedicated room to hold all of their toys!  But that soon spiraled into OMG - I can't even walk in this room because EVERY TOY IN THE HOUSE IS IN HERE!
After a year, we decided to split up their bunk beds and turn the front bedroom back into Owen's room.  This coincided with Emma's 9th birthday, and knowing the kids would probably still like to sleep in the same room together, Brent built the Ana White Farmhouse bed for her room in a full size.
I painted it with Benjamin Moore Hale Navy and our daughter is in love with it.  The other added bonus of putting this full size bed in her room means we sort of have a guest room should we need it. After finishing that bed project, I turned my attention back to Owen's new room.
I removed the heavy fabric curtains to make the windows look larger, but still needed a simple way to block out the light.  Home Depot sells cordless cellular blinds at a pretty reasonable price and they mount inside of the window frame for a clean look.  The walls got a fresh coat of paint in Benjamin Moore Revere Pewter and the ceiling, trim, doors and built-ins are Benjamin Moore White Dove.  The bed in this room is one of the bunk beds.  Brent made caps to go on the top of the bed posts and I painted it with Hale Navy.

Although all of the large windows let in a lot of natural light, evening time is a different story.  He only has one overhead ceiling fan light in his room which was doesn't put off much light.  I didn't want to mess with floor lamps so we hung a set of outdoor lights from Costco by hooks in the ceiling.  The plug in behind the bedroom door so you don't see the cord.  At night, it's beautiful in this room because of the warm light they emit.

Now onto the real project here!  I'd been dreaming of floating shelves to mount on either side of his window to hold his books, Lego creations and whatever else it is that boys like to put on shelves.

Brent began by building 4 of these shelves.
I sanded them and applied a coat of this Minwax Pre-Stain Wood Conditioner.  It allows the wood to absorb the stain more evenly.
Next came a coat of American Walnut stain.


And then for a little change of pace - I put a coat of weathered gray stain over top of the walnut to tone it down a bit.
Here's what the floating shelves look like from the back.
Brent mounted the wood support to the wall and then slides the floating shelf into it.
The make these shelves a little more interesting, we 8 sets of this hardware from the home improvement store.
We spray painted all of the hard ware with this black textured Rust-Oleum spray paint.
Here's what my spray painting station looked like:
After everything was dry, Brent drilled two holes toward the front of the shelf, put the turnbuckle through the U-Shaped hardware and then bolted it underneath.
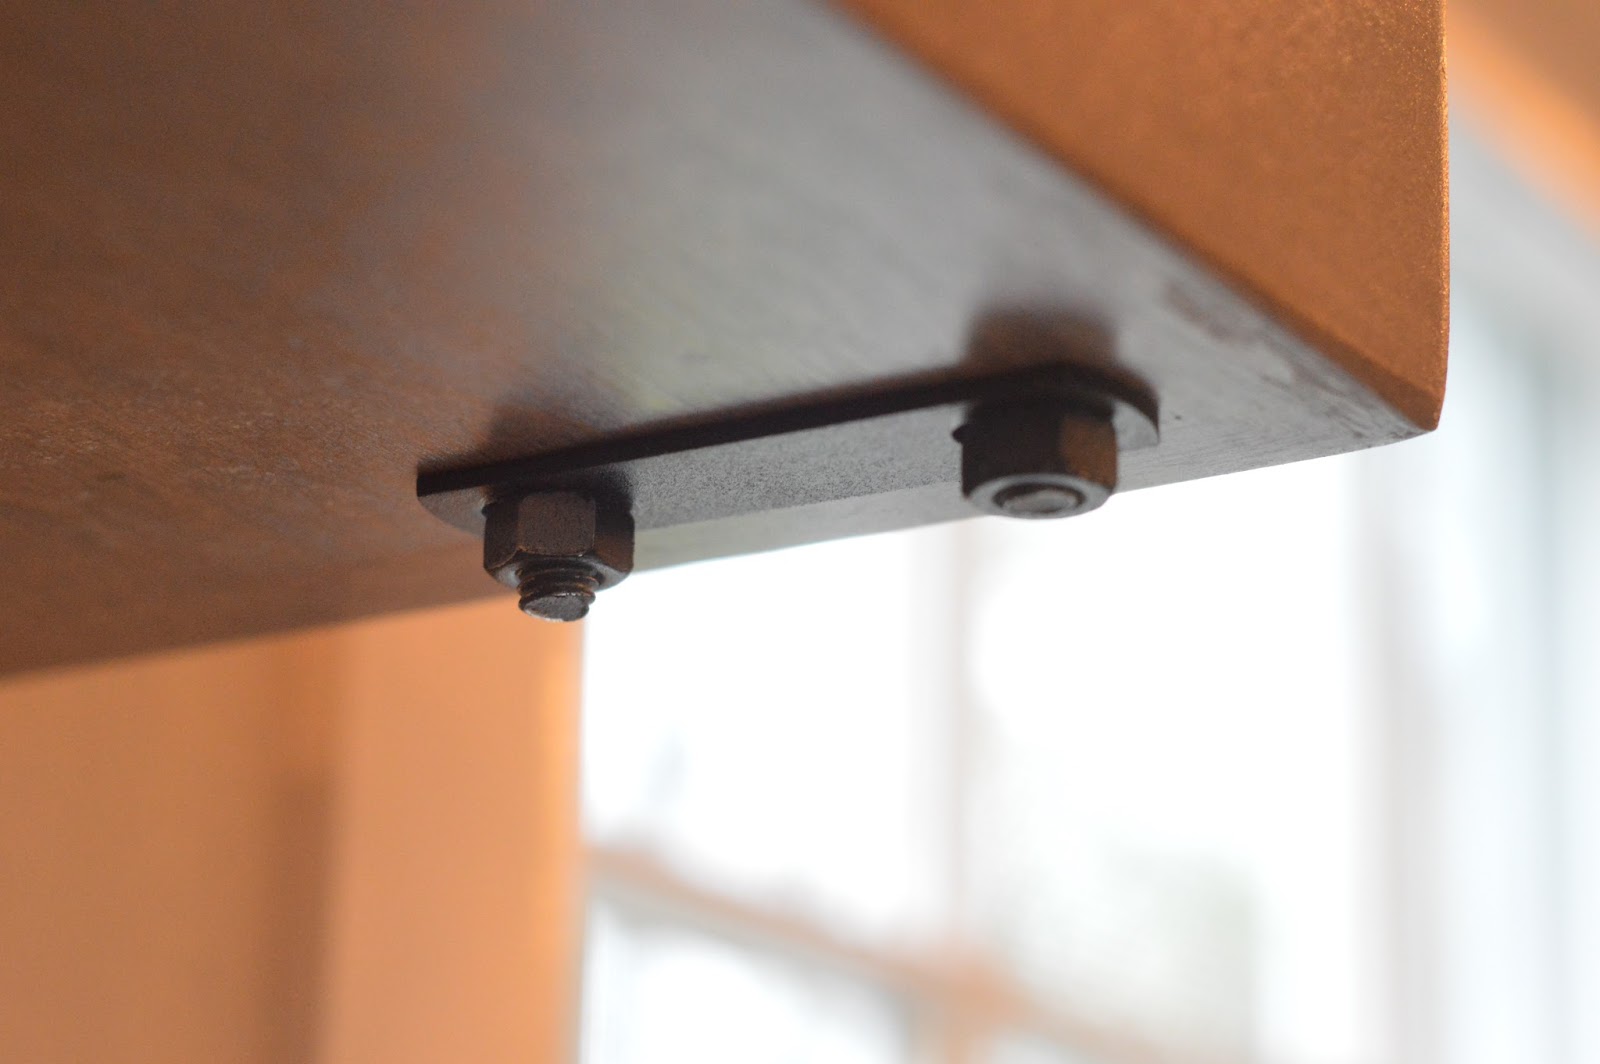
The last step was to hook the other end of the turnbuckle onto this hook piece of hardware and screw it to the wall.  This hardware isn't actually supporting any of the weight of the shelf, so we didn't use any special anchors in the wall plate.
And here's the finished shelving.
This is what his room looks like today - well - correction, it only looks this clean when I'm ready to take pictures.  There are likely Lego's all over the floor in their now, the bed is no longer made and the books spread about.  But whatever, at least it looked good for a few solid minutes.

The floor rug was a last minute addition.  I ordered it from Costco.com to the tune of $100!  And it's a 8x10 rug that's soft and cozy - you can't beat that price!

Monday, January 19, 2015

Kids Bedroom Makeover Part 1 - Paint

Thankfully, I had a three day weekend - because I needed every single second of it to get Emma and Owen's room back to a livable state.  I really, really, really wish I would have decided to paint their room BEFORE we moved the bunk beds in.  It wouldn't have been a big deal to move the beds out for the weekend if the frames fit through the bedroom door, but they don't, which means we would have had to spend a few extra hours taking them apart and relocating to the living room.  I knew we could work around them but it got preeeeetttttyyyy tight.
I went back and forth about whether or not to paint the ceiling...in the end, I knew I would kick myself for not doing it so I stopped pouting long enough to get it done.  And I never thought I would have such a tough time choosing a shade of white for this room!  Pinterest makes it way too easy to become indecisive.  Benjamin Moore White Dove seemed to be a no-fail white from the things I read, so ended up doing one coat of that color in a flat finish on the ceiling.  It was very apparent right away that it was the right decision.  You can see from the photo below how dingy the ceiling had become.
 The great part about Benjamin Moore White Dove is that it is also a great shade of white to use for trim and doors, so we also picked up a gallon of semi-gloss in White Dove.  Emma scrubbed all of the little cracks of the windows with an old toothbrush while we were painting.
 All of the trim and doors received two coats of semi-gloss.
 For the walls, I picked Benjamin Moore Revere Pewter.  It's the same color we have in the living room/dining room and adjoining hallway to the kids room.  I think its going to be a great backdrop for the other things we have planned for their room!
 It was a little tough to get a good photo of the room below...we can't put the bunk beds back into the recessed area yet because that wall will be getting some special treatment.  So just pretend that portion of the beds isn't blocking the view :)
 You can really tell in this next photo how crisp and clean the doors and trim feel with the new paint color.  There were a lot of little fingerprints on the old paint that momma couldn't scrub off anymore!
 The blue wall at the back of this photo is normally where the beds would scooch into - but we're not done back there yet so the beds have to stay in the middle of the room for another week.
Next, we'll be addressing the biggest problem of this bedroom - the lack of lighting.  We went back and forth with several different options to add lighting and we think we've come up with a great solution.  Hopefully we'll have that done by next Monday!  At this point, I'm just relieved the kids can sleep in their own beds again tonight.  All weekend they have been sleeping on a second bed we have upstairs in our master bedroom while we were painting.  I know it was fun for Emma and Owen because it has felt like a big sleepover - but mom and dad are ready to move them out :)

Monday, November 24, 2014

Wood Block Christmas Countdown

I saw a cute idea on Cottage Paint's Instagram feed that I thought would be fun to make with the kids.  As I opened the door to our workshop to cut some blocks, I was happily surprised to find a set all ready for me!  Turns out, I had an extra set of blocks cut AND sanded from making wood block pumpkins a few weeks ago.  Guess this project was meant to be!
We started with some wood blocking, reclaimed wood, of course :)
Brent cut this star out with a jig saw - you have no idea how hard it was for us to draw a star.  I'm talking tricky enough that we had to google it.  Pathetic, huh?
 Emma helped me do all of the painting.
Here's our first coats of paint on the blocks.  We used base coats of regular latex paint and then brushed metallic acrylic paints over top of each one.
To do the wording - because free handing was not an option - trust me, I tried - I followed Her Tool Belt's instructions.  She used Photoshop to get her lettering but since I don't have that, good ol' Microsoft Word worked just fine for me!
 We covered each block of wood with a layer of painter's tape.
 And laid our wording on top.
Using an X-acto knife, I cut around each letter.  I thought this process was going to be pretty quick.  Spoiler, it took forever.  But I put on my headphones and listened to a few episodes of Serial - which is amazing if you haven't heard it - and the time passed rather quickly.
Then I put a few coats of acrylic paint in a contrasting color over the lettering.  Peel the tape off when dry.
 For the top block, where the number of days was going to go, I used this chalkboard paint.
 I taped off a section of the block for the chalkboard paint.
 2 coats later and once it had dried, you can pull the tape off.
 At first, I was planning to glue all of the blocks together but then decided not to.  It will be much easier to store after the holidays if it isn't such a large piece, plus, it's much easier for the kids the erase the top block and write the new number for the day if they can lay it down to do it.

 This was a fun project and the kids are having a blast changing the number each day!