Monday, September 5, 2016

Backyard Makeover

This Spring, on somewhat of a whim, Brent and I decided that this would be the summer that we'd tackle the backyard.  We had a raised brick patio off the house that had been settling pretty badly for the past few years and we knew the time would come that it was going to have to come out.
 In our neighborhood homes are very close together.  With our raised patio, we felt like we were on a stage every time we ate dinner outside since our patio sat almost above the fence line.
Here is a side shot of our patio.  You can see how the bricks are settling.
 This back corner of our yard was a small patio we built shortly after purchasing our house.  This is where we had our fire pit set up for late night summer s'more sessions.  As the years went on, we found we were using it less and less.  I think because it was so far away from the house, it was becoming a chore to haul all of our things all the way back there.
 This is the view from the north side of our house looking back into the yard.  With the raised patio right in the center, it blocked the view of the yard.
 Here's the view from our patio doors off the house.  Notice how the bricks have settled towards the front.  We already fixed that about two summers ago, but without a place for the water to run off, it causes the bricks to settle unevenly.
 These stone stairs down to the yard we also settling and becoming unsafe and unstable.
 And the last caveat of having a brick patio right next to the patio doors...ants.  Lots and lots of ants.
Before starting anything, I drew out our yard on graph paper to determine our plan.  Since we were essentially going to be tearing up a large portion of the yard, we created an order of events to complete everything by Labor Day.  Our goal was to dismantle the existing raised patio and reuse as much of the material as possible.  The walls of the patio would be used to build two large raised garden beds at the back corner of the yard where we get the most sunlight.  The brick pavers of the existing patio would be reused as a new ground level patio.
To give you an idea of what had to do this summer, here's a list!
1. Remove old patio from the back corner of the yard.
     *We sold the paver stones on Craigslist
     *The retaining wall stones were moved over near the shed to edge in the garden beds surrounding      the workshop.

2. Take down the walls of the raised patio and build raised garden beds out of them.
     *I can't accurately describe how difficult this process was.  Each 15 lb stone had block adhesive on      it, which meant using a chipping hammer to remove all of the block adhesive before we could take      it to the raised garden beds to glue back down.  After the beds were built, we still had close to 500      block left, which we gave away for free on Craigslist.  This entire process of taking down the patio      walls, building the garden beds and getting rid of the rest took close to a month.  Probably some of      the most exhausting work I've ever done.

3. With the patio walls gone, we took up all of the existing brick patio pavers that made up the floor of the existing raised patio. 
     *This step wouldn't have been too bad but there was polymeric sand on each brick that needed to        be chipped off.  And I don't mean a simple scrape.  I mean chipped, like with a hammer and chisel.      Close to 1500 bricks by our calculations.  This was an important step though because every brick        we could reuse would save us close to .70 cents (that's the cost to buy a new one).  We set up              pallets in three locations around the patio that we would stack the clean bricks on.  This way, when     we were ready to lay the new patio, the bricks would be close by.

4.  Now that the bricks were out of the way, we set to work removing approximately 13 tons of sand.  With wheelbarrows and shovels.  Worst weekend of my life.  Luckily we had our parents and one brave neighbor to help us.

5.  Under the sand, was about 5 tons of black dirt that had to come out.  We used some of it to fill in our raised garden beds, some to level out some areas of our yard and the rest got dumped.

6.  At this point, we prepped our sand base, packed it and laid the brick pavers back down at ground level.  We got to use our paver patio bricks from the old patio but we knew there wouldn't be enough, so we had to purchase about 1000 more bricks and we sprinkled those in with the old so you can't tell which are old and which are new.

7.  The deck was built when the patio pavers were done.

8.  Patio lights were hung.

9.  And finally, this weekend, we built the fence around the garden.

Inside the garden area, we left about 2 foot wide pathways around the perimeter of the beds.
The lights on top of the posts are solar lights.  Fencing and gate was all custom built by Brent.
In the Spring, we will put down a thick layer of mulch on the garden pathways.
For the deck, we used Cedar Toned Green Treat from Home Depot.  Real cedar is incredibly expensive, so this was a nice alternative.  After a year we can stain it if we wish.
Exterior wall sconces flanking the patio doors are from Lowe's.
The stones for the small retaining wall are from Lowe's.
 This is just a $20 screen door from our home improvement store, painted with Benjamin Moore Wythe Blue.
 Brent built this custom railing as well.  Caps are solar lights from the home improvement store.
 I picked up the World Market Adirondack chairs from Craigslist and painted them with Benjamin Moore Tequila Lime.
 We made this little stepping stone path at the bottom of the deck stairs to make it easy to cut through the garden.
 For the deck, we picture framed the edge to give it a more finished look.  We also used the Kreg Jig Deck Jig so most of the screws on the deck are hidden.  Took quite a bit of time to do this, but well worth it in the end!
 It was important to me that the edge of the deck be finished as well.  Brent used cedar fence pickets to cover the edge.
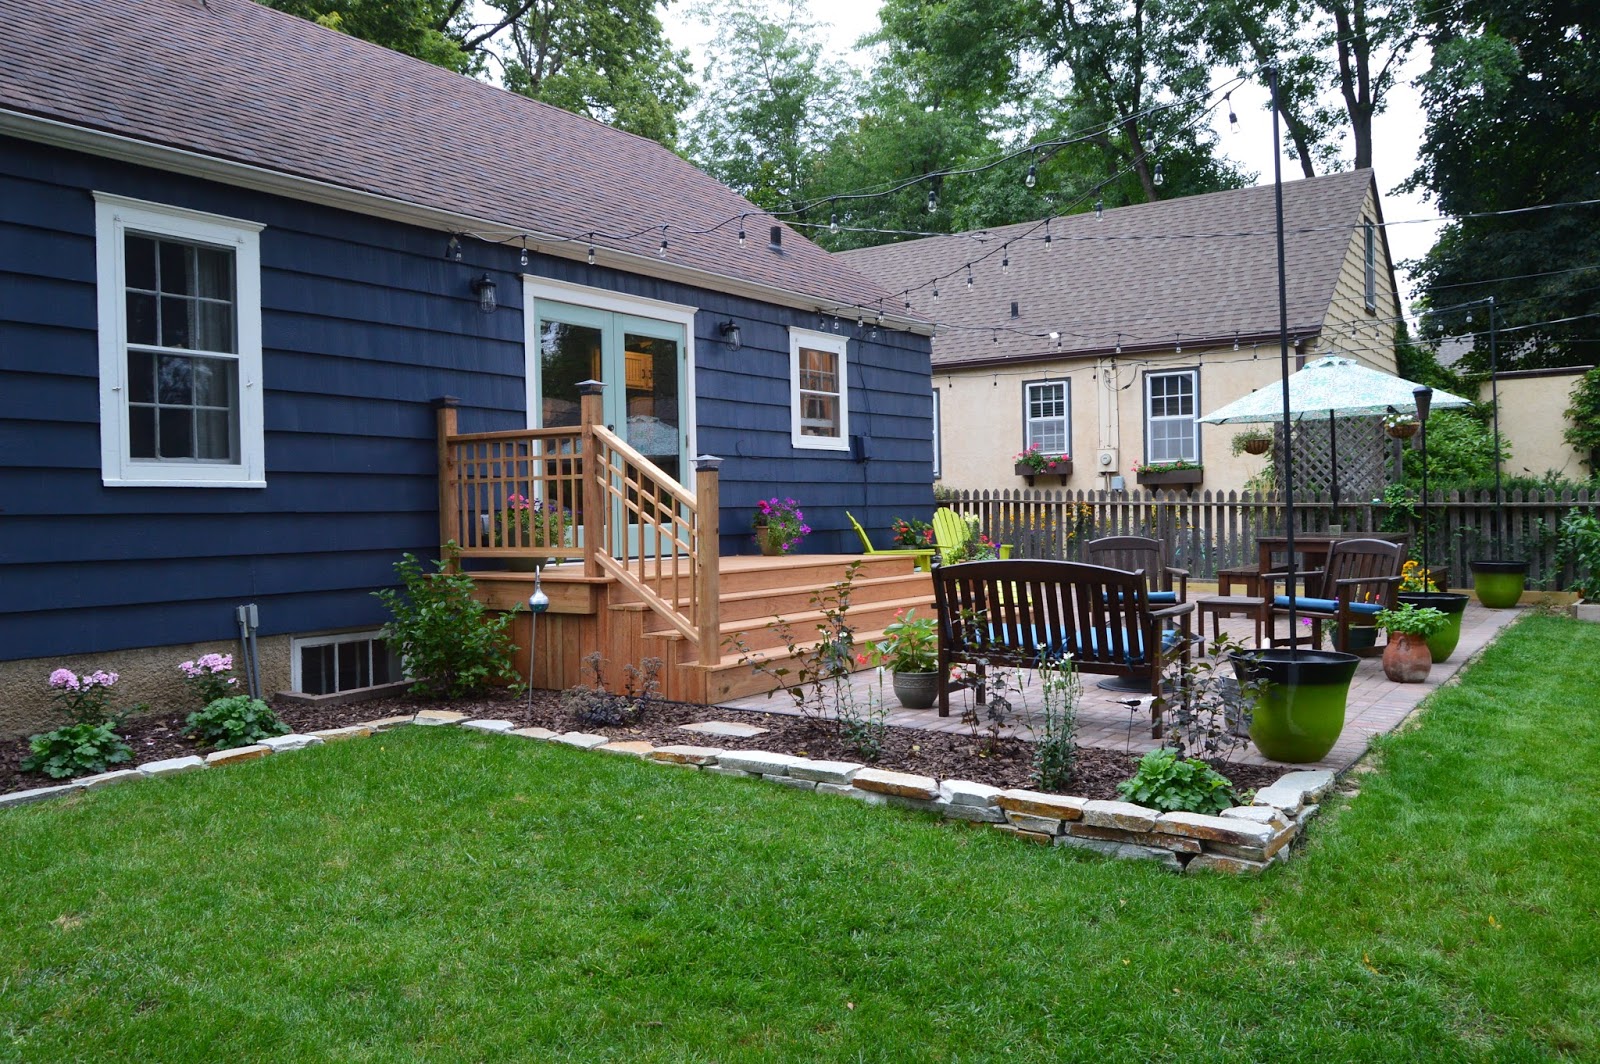
For the patio lights, we set metal conduit poles into concrete poured into plastic flower pots (then covered in dirt once dry).  1/16 galvanized wire was pulled from the poles to the house and then the string lights, from Costco, were zip tied to the tension wire.
It's been a long, exhausting summer.  But each day, we are so overjoyed that this is our yard and we got to create it.  We've already had plenty of evenings on the patio with friends and family around the fire and are looking forward to next Spring when we get to plant our garden.

And now if you'll pardon me, I've got some Netflix shows to catch up on followed by a nice, long nap.

Saturday, April 30, 2016

Industrial Floating Shelves

About a year ago, this is what our children's bedroom looked like.  Then Brent and I bought a California King bed (BTW it's AMAZING!) and it shook up the whole household.  Living with a queen size wasn't working for us anymore - snuggling with four people to watch a movie or read nighttime books was getting a little tight, which was the reason for the upgrade. We knew that with the purchase of that large bed meant Brent and I would need to relocate our master bedroom to the second floor to accommodate such a large bed.  After we moved upstairs, that left two bedrooms on the main floor, one for each kid.  
Problem is, they still prefer to sleep in the same room, so we moved both of them to the back bedroom and this front bedroom became their "playroom."  Which sounded great at first - WOW - a dedicated room to hold all of their toys!  But that soon spiraled into OMG - I can't even walk in this room because EVERY TOY IN THE HOUSE IS IN HERE!
After a year, we decided to split up their bunk beds and turn the front bedroom back into Owen's room.  This coincided with Emma's 9th birthday, and knowing the kids would probably still like to sleep in the same room together, Brent built the Ana White Farmhouse bed for her room in a full size.
I painted it with Benjamin Moore Hale Navy and our daughter is in love with it.  The other added bonus of putting this full size bed in her room means we sort of have a guest room should we need it. After finishing that bed project, I turned my attention back to Owen's new room.
I removed the heavy fabric curtains to make the windows look larger, but still needed a simple way to block out the light.  Home Depot sells cordless cellular blinds at a pretty reasonable price and they mount inside of the window frame for a clean look.  The walls got a fresh coat of paint in Benjamin Moore Revere Pewter and the ceiling, trim, doors and built-ins are Benjamin Moore White Dove.  The bed in this room is one of the bunk beds.  Brent made caps to go on the top of the bed posts and I painted it with Hale Navy.

Although all of the large windows let in a lot of natural light, evening time is a different story.  He only has one overhead ceiling fan light in his room which was doesn't put off much light.  I didn't want to mess with floor lamps so we hung a set of outdoor lights from Costco by hooks in the ceiling.  The plug in behind the bedroom door so you don't see the cord.  At night, it's beautiful in this room because of the warm light they emit.

Now onto the real project here!  I'd been dreaming of floating shelves to mount on either side of his window to hold his books, Lego creations and whatever else it is that boys like to put on shelves.

Brent began by building 4 of these shelves.
I sanded them and applied a coat of this Minwax Pre-Stain Wood Conditioner.  It allows the wood to absorb the stain more evenly.
Next came a coat of American Walnut stain.


And then for a little change of pace - I put a coat of weathered gray stain over top of the walnut to tone it down a bit.
Here's what the floating shelves look like from the back.
Brent mounted the wood support to the wall and then slides the floating shelf into it.
The make these shelves a little more interesting, we 8 sets of this hardware from the home improvement store.
We spray painted all of the hard ware with this black textured Rust-Oleum spray paint.
Here's what my spray painting station looked like:
After everything was dry, Brent drilled two holes toward the front of the shelf, put the turnbuckle through the U-Shaped hardware and then bolted it underneath.
The last step was to hook the other end of the turnbuckle onto this hook piece of hardware and screw it to the wall.  This hardware isn't actually supporting any of the weight of the shelf, so we didn't use any special anchors in the wall plate.
And here's the finished shelving.
This is what his room looks like today - well - correction, it only looks this clean when I'm ready to take pictures.  There are likely Lego's all over the floor in their now, the bed is no longer made and the books spread about.  But whatever, at least it looked good for a few solid minutes.

The floor rug was a last minute addition.  I ordered it from Costco.com to the tune of $100!  And it's a 8x10 rug that's soft and cozy - you can't beat that price!